Is 220 Ohm Resistor Enough for LED? A Quick Answer
Is 220 ohm resistor enough for LED work? Most of the time, yes. On a 5V supply, a 220 ohm resistor holds a standard LED near 13 mA, which is safe and plenty bright. Push it onto 9V or 12V and the story changes fast. The answer depends on two numbers only: your supply voltage and the LED forward voltage.
Last updated: August 13, 2026. Recalculated the current at each rail, fixed one math slip in the 12V case, and added a decision guide plus an FAQ.
For a quick verdict without the whole rundown: keep the 220 for anything below 6 volts. Swap it for something larger the moment you climb higher. That is the bench rule I use, and it holds for almost every hobby build.
The Short Verdict, By Supply Voltage
Here is the whole answer in one table. I built it from the same current-limit math I run on the bench.
| Supply | LED Vf | Current through 220Ω | Is it safe? |
|---|---|---|---|
| 3.3V | 2.0V (red) | 5.9 mA | Safe, a bit dim |
| 5V | 2.0V (red) | 13.6 mA | Ideal |
| 5V | 3.2V (blue/white) | 8.2 mA | Safe, slightly dim |
| 9V | 2.0V (red) | 31.8 mA | Too much |
| 12V | 3.5V (blue) | 38.6 mA | Way too much |
So the honest reply to “is 220 ohm resistor enough for LED” is a firm yes at 5V, a soft yes at 3.3V, and a no once you climb past a 9V rail.
Why LEDs Even Need a Resistor
An LED is not a light bulb. It is a diode. Once you cross its forward voltage, current shoots up with almost no extra voltage, and nothing inside the part stops it. That runaway current is what kills LEDs.
A standard 5mm LED wants about 20 mA at its peak and drops between 2.0V and 3.4V depending on color. Red sits low, near 2.0V. Blue and white sit high, near 3.2V. The resistor is the brake. It soaks up the leftover voltage and pins the current to a sane number. If you want the fuller picture on why that brake gets warm, I wrote up how much heat a current-limiting resistor throws off in a separate post.
The Ohm’s Law Math, Step By Step
Everything runs on one rearranged form of Ohm’s law. You can read the full statement of the law over at Fluke, but the working version is short.
- Start with the supply voltage.
- Subtract the LED forward voltage. What is left is the voltage across the resistor.
- Divide that by the resistance. That gives you the current.
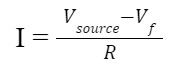
In symbols: I = (V_supply − V_f) / R. Plug in your rail, your LED color, and 220. Done.
Scenario 1. A 3V LED on a 9V battery.
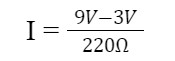
The result is I ≈ 27.3 mA. That already sits above the 20 mA comfort line. The LED will light, but it runs warm and its life gets shorter. Not great.
Scenario 2. A 3.5V blue LED on a 12V supply.
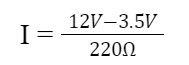
That gives I ≈ 38.6 mA. Roughly double the rating. The old version of this post printed 36.6 mA here, which was a slip. The math is (12 − 3.5) / 220, and that is 38.6 mA. At that current a 220 ohm resistor also burns about 0.33 W, so a quarter-watt part would cook. Bad idea all round.
Scenario 3. A 2V red LED on a 3V coin cell.
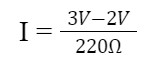
Here I ≈ 4.5 mA. Totally safe. The only cost is brightness. At under 5 mA the LED glows rather than shines, which is often fine for an indicator.
When Is 220 Ohm Resistor Enough for LED Circuits?
Use this branching guide instead of guessing. Find your rail, then read across.
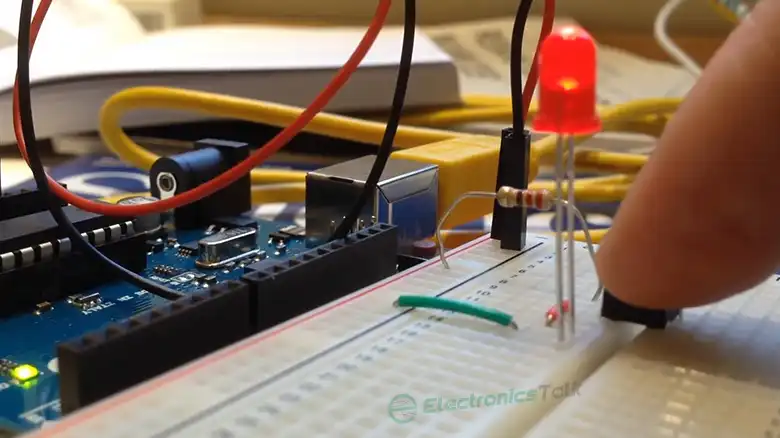
- 5V rail (Arduino, USB, most logic): Yes. Keep the 220. You will land between 8 mA and 14 mA depending on LED color. Safe and bright.
- 3.3V rail (ESP32, Pi GPIO): Yes, with a caveat. Red and green look fine near 6 mA. Blue and white may look dim because only 0.1V is left to drive them. Drop to 100Ω if you want them brighter.
- 9V rail: No, not really. A red LED pulls close to 32 mA. Move up to a 330Ω or 470Ω resistor instead.
- 12V rail: No. You are into 38 mA territory and real heat. Use 470Ω to 680Ω, and pick a half-watt part.
My bench rule is blunt: “keep every LED under its rated current, and it lasts for years.” A well-driven indicator LED is rated for 50,000 hours, which is over 10 years of always-on service. Cook it at 2 times its rating and you throw most of that away.
How I Check This On The Bench
When I am not sure, I do not trust the datasheet blindly. I put a multimeter in series with the LED and read the actual current. If it reads more than about 18 mA on a part I want to last, I bump the resistor up one standard value. Cheap, fast, and it has saved me a hundred blown LEDs.
One more thing people forget: resistors are not perfectly stable, and a 5% carbon film part can sit a little off its marking. If that worries you for a precision circuit, I covered whether a resistor’s value drifts as it ages and when a 1% metal film is worth the extra cost. For most LED work, though, 5% is fine.
If your problem is really about a much higher rail, a single resistor is the wrong tool. See the walkthrough on dropping a bigger voltage down to a usable level, and if you are pushing a high-voltage line, check the voltage a resistor can actually take first. You can read the broader background on the part itself on Wikipedia’s LED page.
A Few Bench Pitfalls Worth Naming
Beyond the raw math, a handful of small mistakes trip beginners. I keep spotting the same ones at meetups.
- Reversed polarity. LEDs care about orientation. Wire the anode to positive, cathode to ground. Backwards, the diode blocks and stays dark. Some indicator packages tolerate a few volts of reverse bias, most do not.
- Wattage forgotten. People pick the correct ohms but grab a fragile eighth-watt part. On a 12V rail your dissipation climbs near a third of a watt, so a half-watt carbon film survives comfortably where a smaller pellet browns.
- Loose breadboard jumpers. A wobbly contact shows up as flicker or as a suspiciously dim glow. Rework the row, reseat the wire, and the ghost mystery disappears.
- Wrong color assumed. A “clear” package could be red, blue, or infrared. Meter the forward drop before you commit to a ohms figure. Infrared often reads near 1.2 volts, which throws off any calculation built around a visible junction.
- Batch tolerance ignored. Cheap reels sometimes carry a spread of luminous output. Two indicators of the same nominal color can look uneven side by side, even at identical current.
Notice how none of these pitfalls involve the arithmetic. They are choices around the arithmetic. Solid components, clean wiring, and a quick sanity read with your meter erase most of them before they ever cost you a chip.
Frequently Asked Questions
Is 220 ohm resistor enough for LED on 5V?
Yes. On a 5V supply a red LED draws about 13.6 mA through a 220 ohm resistor, and a blue or white LED draws about 8 mA. Both are safe and bright. This is the classic pairing you see on almost every Arduino board.
Will a 220 ohm resistor be too dim?
Only on low rails or with high-Vf colors. At 3.3V a blue LED may look weak because barely 0.1V is left to push it. On 5V with a red LED, the light is strong. If you want more punch, drop to 150Ω or 100Ω.
What resistor should I use for an LED on 12V?
Not 220. Use 470Ω to 680Ω, and choose a half-watt resistor. A 220 ohm part on 12V passes close to 38 mA and dissipates about 0.33 W, which overheats a small quarter-watt resistor.
Can I run an LED with no resistor at all?
Almost never. Without a resistor the current is limited only by the source, and a diode has nothing to hold it back. Even a coin cell can push an LED past its rating. Some 3V button cells are the rare exception because their internal resistance is high.
How do I calculate the right resistor value?
Subtract the LED forward voltage from your supply, then divide by your target current. For 20 mA on a 5V rail with a 2V red LED: (5 − 2) / 0.02 = 150Ω. Round up to the nearest standard value for a safety margin.
Bottom Line
Is 220 ohm resistor enough for LED use? On a 5V or 3.3V rail, yes, and it is the value I reach for by default. Once your supply hits 9V or 12V, a 220 ohm resistor lets too much current through, so step up to 330Ω, 470Ω, or higher and mind the wattage. Run the two-number math, and you will never guess again.